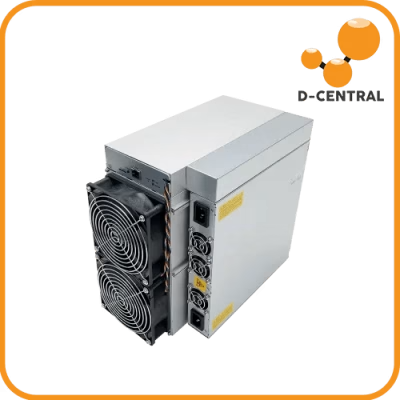
Every ASIC miner is a heat engine. Your Antminer S19, your Whatsminer M50, your S21 — they convert electricity into SHA-256 hashes, and the thermal byproduct is relentless. The fan grills standing between your hashboards and the outside world are the front line of your miner’s survival. Let them clog, and you are not just losing airflow — you are bleeding hashrate, burning extra watts, and shortening the life of hardware that secures the Bitcoin network.
At D-Central Technologies, we have been repairing and maintaining ASIC miners since 2016. Our repair bench has processed thousands of units, and the single most common preventable failure we see comes down to one thing: neglected cooling systems. Dirty fan grills are the gateway to thermal throttling, blown fans, and fried hashboards. The good news? Cleaning and restoring them is straightforward work that any home miner can handle with the right approach.
This guide covers everything: how your cooling system works, what tools you need, step-by-step cleaning procedures, rust restoration, reassembly, long-term maintenance, and troubleshooting. Whether you are running a single unit heating your garage or a rack of machines in your basement, this knowledge will keep your miners hashing strong.
How Your ASIC Miner’s Cooling System Works
Before you pick up a brush, understand what you are maintaining. ASIC miners are forced-air cooling machines. Two high-RPM fans (intake and exhaust) push air across aluminum heatsinks that sit directly on top of your ASIC chips. The fan grills are the mesh screens mounted on the intake and exhaust sides of the miner chassis.
The Airflow Path
The airflow follows a simple but critical path:
- Intake fan grill — ambient air enters through the mesh screen
- Intake fan — accelerates air across the hashboards
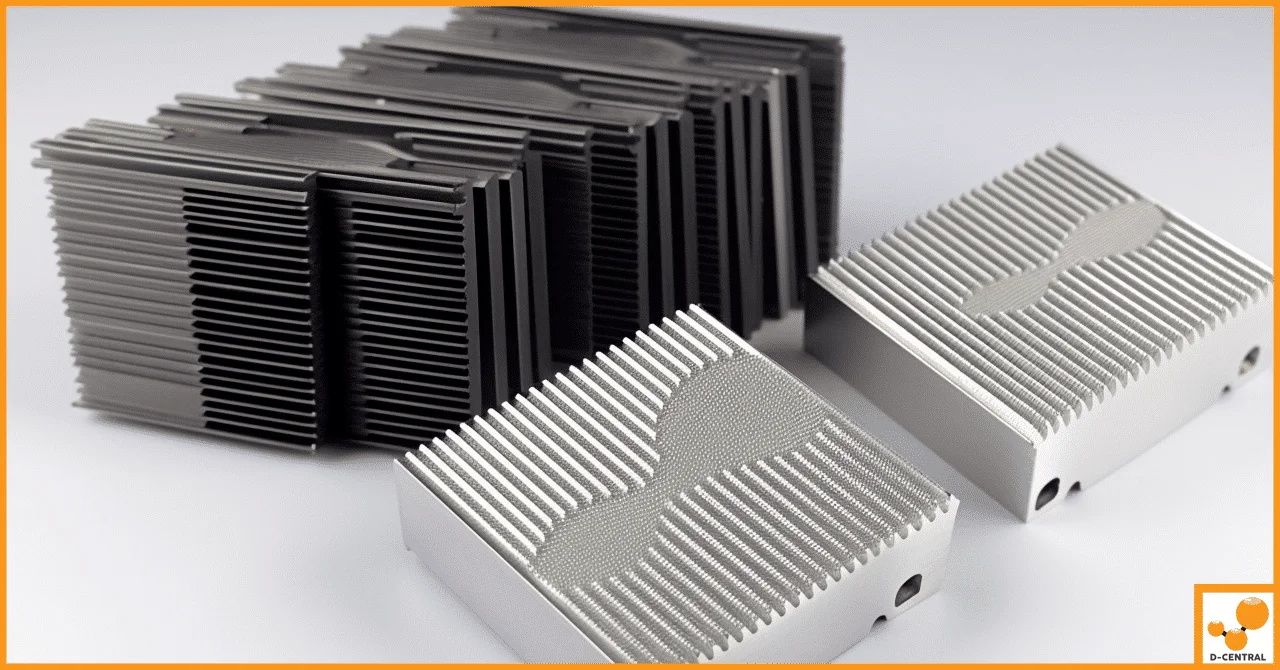
- Heatsinks — aluminum fins absorb heat from ASIC chips via thermal paste contact
- Exhaust fan — pulls hot air through the chassis
- Exhaust fan grill — hot air exits the miner
Every link in this chain matters. When fan grills accumulate dust, lint, pet hair, or debris, airflow restriction begins. The fans spin harder to compensate, drawing more power. Chip temperatures climb. The firmware responds with thermal throttling — reducing clock speeds to prevent damage. Your hashrate drops, your power consumption stays the same or increases, and your efficiency craters.
What Happens When You Ignore It
| Symptom | Cause | Consequence |
|---|---|---|
| Chip temps above 85°C | Restricted airflow from clogged grills | Thermal throttling, reduced hashrate |
| Fan RPM at maximum | Fans compensating for blocked intake | Increased noise, accelerated bearing wear |
| Hashrate 10-30% below spec | Firmware throttling due to heat | Lost revenue, wasted electricity |
| Fan failure | Bearing burnout from sustained overwork | Emergency shutdown, potential chip damage |
| Hashboard failure | Prolonged overheating damages ASIC chips | Expensive repair or total loss |
The takeaway is simple: a $2 dust filter or 30 minutes of cleaning can prevent a $500+ hashboard repair. Maintenance is not optional — it is the foundation of profitable mining.
Tools and Materials You Need
You do not need specialized equipment. Most of this is available at any hardware store or already in your workshop.
Essential Tools
| Tool | Purpose | Notes |
|---|---|---|
| Electric air blower or canned compressed air | Primary dust removal | Electric blower preferred — canned air runs out fast and can spray moisture if tilted |
| Soft-bristle brush (anti-static) | Dislodge caked-on dust | A clean paintbrush works well |
| Isopropyl alcohol (91% or higher) | Deep cleaning sticky residue | Higher concentration = faster evaporation = less moisture risk |
| Microfiber cloths | Wiping surfaces without scratching | Lint-free is critical |
| Phillips screwdriver | Removing fan grills and covers | Most Bitmain units use Phillips head screws |
| Safety glasses and nitrile gloves | Personal protection | Dust clouds from mining environments can be significant |
For Rust Restoration (If Needed)
- Fine-grit sandpaper (220-400 grit)
- Rust converter or white vinegar
- High-temperature spray paint (matte black)
- Masking tape
Pre-Cleaning: Safety and Assessment
Safety First — Always
- Power down the miner through its web interface or by shutting down gracefully. Never yank the power cord on a running miner — you risk corrupting the SD card or NAND flash.
- Disconnect from the power supply. Unplug the PSU from the wall, then disconnect the PCIe power cables from the miner. ASIC power supplies can hold residual charge — wait 30 seconds after unplugging.
- Let it cool. Exhaust temperatures on a running S19-series can exceed 60°C. Give the unit at least 10 minutes to cool to a safe handling temperature.
- Work in a ventilated area. Mining dust can contain fine metal particles, fiberglass from PCB substrates, and general environmental debris. Work outdoors or in a well-ventilated garage.
Initial Assessment
Before you start cleaning, do a quick diagnostic:
- Visual inspection: Check both fan grills for dust density. Heavy matting (where you cannot see through the grill) means severely restricted airflow.
- Fan spin test: With power disconnected, gently spin each fan by hand. It should rotate freely with minimal resistance. Grinding or stiffness indicates bearing wear.
- Rust check: Look for orange-brown discoloration on the metal grill mesh, especially if the miner has been in a humid environment. Surface rust is restorable; deep pitting may require grill replacement.
- Take photos: Document the condition before cleaning. This creates a baseline for tracking degradation over time and is useful if you ever need to file a warranty or repair claim.
Step-by-Step Cleaning Process
Phase 1: Dry Dust Removal
This handles 80% of typical cleaning jobs.
- Remove the fan grills. Most Antminer models use four Phillips screws per grill. Set screws aside in a magnetic tray or container — losing a screw means a loose grill rattling against the fan.
- Blow out the grills. Hold the grill away from the miner and blast both sides with compressed air. Work from the clean side outward to push debris off rather than embedding it deeper in the mesh.
- Blow out the fans. With the grills removed, you have direct access to the fan blades. Use short bursts of air to spin dust off each blade. Important: Hold the fan hub with your finger while blowing — letting the fan free-spin at high speed from compressed air can damage the bearings or generate back-EMF that could harm the control board.
- Blow through the heatsinks. Point the blower straight through the miner’s heatsink channels from intake side to exhaust side. You will see dust clouds exit the back. Keep going until the air runs clear.
- Brush stubborn spots. Use the soft-bristle brush to dislodge any caked-on dust from the grill mesh, fan blades, and heatsink fins. Brush in the direction of airflow.
Phase 2: Deep Cleaning for Sticky or Humid-Environment Dust
If your miner has been running in a humid basement, near a kitchen, or in a dusty workshop, the dust may have bonded to surfaces with moisture and oil. Dry blowing alone will not cut it.
- Dampen a microfiber cloth with isopropyl alcohol (91%+). Wring it out thoroughly — you want it damp, not wet.
- Wipe down the fan grills on both sides. The alcohol dissolves greasy residue and evaporates quickly without leaving moisture behind.
- Scrub the mesh with a brush dipped in IPA. For grills with embedded grime, use a soft brush lightly dipped in isopropyl alcohol to scrub the mesh openings. Work in small sections.
- Clean the fan blades individually with IPA and a cloth. Residue on fan blades creates imbalance that causes vibration and noise.
- Wipe heatsink surfaces where accessible. Do not pour or spray alcohol directly onto the hashboard — apply to cloth first, then wipe.
- Let everything dry completely. IPA at 91%+ evaporates within minutes, but verify that all surfaces are dry before reassembly. No exceptions.
Phase 3: Restoring Rusted Fan Grills
Rust is common on miners that have been in humid environments, outdoor setups, or locations near salt air. Surface rust is cosmetic and fixable. Deep pitting that has eaten through the mesh wires means the grill needs replacement — check our parts shop for replacements.
- Remove all dust first using Phase 1 and Phase 2 methods.
- Sand the rusted areas with 220-grit sandpaper until you reach clean metal. Switch to 400-grit for a smoother finish.
- Apply rust converter (or soak in white vinegar for 30 minutes) to chemically neutralize remaining oxidation.
- Rinse with IPA and dry thoroughly.
- Mask off the fan mounting holes with tape to keep them clear of paint.
- Apply 2-3 thin coats of high-temperature matte black spray paint. Allow each coat to dry per the manufacturer’s instructions. This creates a barrier against future corrosion.
- Let the paint cure fully (24 hours minimum) before reinstalling on the miner.
Reassembly and Post-Cleaning Verification
Putting It Back Together
- Reinstall fan grills with all original screws. Finger-tight plus a quarter turn — do not overtighten, as this can warp the grill or strip the threads in the plastic fan housing.
- Reconnect power cables. PCIe connectors should click firmly into place. A loose power connection is a fire hazard.
- Power on and monitor. Access the miner’s web interface immediately after boot and watch the following metrics for the first 15-30 minutes:
| Metric | Healthy Range | Red Flag |
|---|---|---|
| Chip temperature | 55-75°C (varies by model) | Above 80°C or rising steadily |
| Fan RPM | Model-specific, consistent between intake/exhaust | One fan significantly faster or slower than the other |
| Hashrate | Within 5% of rated spec after warm-up | More than 10% below spec after 30 minutes |
| Power consumption | Near rated wattage | Significantly higher than expected |
| Hardware errors | Near zero | Climbing error count on any hashboard |
Compare Before and After
If you logged your pre-cleaning chip temperatures and hashrate (and you should), compare them now. A successful cleaning typically yields:
- 5-15°C drop in chip temperatures
- Noticeable reduction in fan RPM (fans do not have to work as hard)
- Recovery of any hashrate lost to thermal throttling
- Quieter operation
Maintenance Schedule: Prevention Over Repair
Cleaning is good. Preventing the need for aggressive cleaning is better. Here is the maintenance schedule we recommend to our clients at D-Central.
Recommended Intervals
| Environment | Visual Inspection | Full Cleaning | Deep Clean + Restoration |
|---|---|---|---|
| Clean indoor room (filtered HVAC) | Monthly | Every 6 months | Annually |
| Garage or basement | Every 2 weeks | Every 3 months | Every 6 months |
| Workshop or dusty environment | Weekly | Monthly | Every 3 months |
| Outdoor or semi-enclosed setup | Weekly | Monthly | Every 2 months |
| Home with pets | Weekly | Every 2 months | Every 4 months |
Environmental Controls That Extend Cleaning Intervals
- Intake dust filters: Aftermarket magnetic or clip-on filters on the intake side catch dust before it enters the miner. Clean or replace the filter monthly — it is far easier than cleaning the miner internals.
- Shrouds and ducting: A proper shroud and duct setup directs airflow from a clean source and exhausts it outside. This is standard practice for home miners using their ASIC as a Bitcoin space heater — the ducting serves double duty by channeling warm exhaust where you want it while keeping intake air filtered.
- Humidity control: Keep relative humidity between 30-60%. Below 30%, static discharge becomes a risk. Above 60%, dust turns into adhesive sludge that bonds to every surface. A basic hygrometer costs a few dollars and saves you grief.
- Elevated placement: Miners on the floor ingest the most dust. Even raising a miner 12-18 inches on a shelf or rack significantly reduces dust intake.
Troubleshooting Post-Cleaning Issues
Sometimes things do not go perfectly. Here is how to diagnose and fix common problems after a cleaning session.
Unusual Noises After Reassembly
- Rattling or buzzing: A loose fan grill screw is the most common cause. Check that all screws are seated. Also verify that no zip ties, cable labels, or debris are contacting the fan blades.
- Grinding sound: This indicates fan bearing damage, possibly from spinning the fan too fast with compressed air. The fan will need replacement. D-Central stocks replacement fans for most major ASIC models.
- High-pitched whine: If the fan grill is warped from overtightening or accidental bending, it can partially obstruct the fan and cause turbulence noise. Inspect the grill for flatness.
Temperatures Still High After Cleaning
- Thermal paste degradation: If your miner is more than 2 years old, the thermal paste between the heatsink and ASIC chips may have dried out. This requires a heatsink removal and thermal paste replacement — a more advanced procedure. Our ASIC repair service handles thermal paste replacement for all major models.
- Ambient temperature too high: In Canadian summers, garage temperatures can spike. No amount of cleaning fixes a 40°C ambient environment. Consider ducting intake air from a cooler source or relocating the miner.
- Failed fan: A fan can spin but deliver reduced airflow if its blades are damaged or its motor is weakening. Compare RPM readings between intake and exhaust — they should be close to each other.
Reduced Hashrate After Cleaning
- Loose power connector: The most common culprit. Reseat all PCIe power connectors firmly. A hashboard without solid power delivery will underperform or drop offline entirely.
- Data cable disconnection: On some models, the flat ribbon cable connecting the hashboard to the control board can be partially dislodged during handling. Check and reseat.
- Firmware glitch: Power cycling during cleaning (especially if the SD card was bumped) can cause firmware corruption. Reflash the control board firmware from Bitmain or MicroBT’s official site.
When to Call the Professionals
If cleaning and basic troubleshooting do not resolve the issue, the problem is likely hardware-level: a failing hashboard, damaged ASIC chip, or control board fault. These require diagnostic equipment and soldering expertise. D-Central’s ASIC repair team has been diagnosing and repairing miners since 2016 — we handle everything from individual chip replacement to full hashboard rebuilds. If you prefer a hands-off approach entirely, our Quebec hosting facility handles all maintenance for hosted machines.
Why This Matters for Bitcoin’s Decentralization
This article is about cleaning fan grills, but the deeper point is about sovereignty. Every miner you keep running at home — whether it is an S9 heating your workshop or a Bitaxe sitting on your desk — contributes to the geographic distribution of Bitcoin’s hashrate. In 2026, with the network hashrate exceeding 800 EH/s and difficulty above 110T, every terahash you add from your home strengthens the network against centralization.
Maintaining your hardware is an act of decentralization. A miner that overheats and dies is hashrate lost from the network’s edge — from the homes, garages, and basements where it matters most. The institutions will always have maintenance teams. The home miners need to be their own maintenance teams.
That is the Mining Hacker ethos: take the knowledge, own the process, keep your machines running, and keep Bitcoin decentralized.
Frequently Asked Questions
How often should I clean my ASIC miner’s fan grills?
It depends on your environment. In a clean indoor room with filtered HVAC, every 6 months is sufficient. In a garage, basement, or home with pets, every 2-3 months is recommended. Do visual inspections more frequently — if you can see dust matting on the grill mesh, it is time to clean regardless of the schedule.
Can I use a household vacuum cleaner instead of compressed air?
It is not recommended as a primary tool. Standard vacuums can generate static discharge that damages sensitive electronics. If you use a vacuum, use one with an anti-static nozzle and keep it as a secondary tool for capturing dust blown off by compressed air — not for direct contact with the miner’s internals.
What concentration of isopropyl alcohol should I use?
Use 91% or higher. The higher the concentration, the faster it evaporates and the less moisture it leaves behind. Never use 70% IPA on electronics — the 30% water content takes too long to evaporate and can cause corrosion or short circuits if it reaches the PCB.
Is it safe to remove the fan grills while the miner is running to improve airflow?
Technically, removing the grills does slightly improve airflow. However, it exposes the fan blades to accidental contact (a dropped tool or cable can instantly destroy a fan) and allows larger debris to enter the miner. The marginal airflow gain is not worth the risk. If your miner runs hot even with clean grills, the issue is likely thermal paste, ambient temperature, or fan degradation — not grill restriction.
My fan grills have heavy rust. Should I replace them or try to restore?
If the rust is surface-level and the mesh wires are still structurally intact, restoration (sanding, treating, and painting) works well and costs almost nothing. If the rust has eaten through wires or the grill is structurally weakened, replace it. Running a miner with a compromised grill risks debris entering the fan assembly.
Can dirty fan grills actually damage my ASIC chips?
Yes, indirectly. Clogged grills cause restricted airflow, which causes elevated chip temperatures. ASIC chips operating above their thermal design limits degrade faster, develop increased error rates, and can fail permanently. The damage is not instant — it is cumulative. Every hour running at elevated temperatures shortens chip lifespan.
I cleaned my miner but one hashboard is still underperforming. What should I do?
A single underperforming hashboard after cleaning usually indicates a hardware issue unrelated to dust: degraded thermal paste, a failing ASIC chip, or a loose data/power connection on that specific board. Reseat all connectors on the affected board first. If the problem persists, it needs professional diagnosis. D-Central’s repair service can diagnose and fix individual hashboard issues.
Does D-Central offer maintenance services for home miners?
Yes. We offer full ASIC repair services including cleaning, thermal paste replacement, fan replacement, hashboard diagnosis, and chip-level repair. We also provide mining consulting for home miners looking to optimize their setup, and training resources for those who want to learn to maintain their own equipment. For miners who prefer a fully managed approach, our hosting facility in Quebec handles all maintenance.
 Bitaxe Heatsink — High-Performance Aluminum Cooler for Bitaxe & Nerdaxe Gamma / Supra / Ultra — Silent Operation & Stable Overclocking" width="80" height="80" loading="lazy" style="width:80px;height:80px;object-fit:contain;border-radius:6px;background:#1A1A1A;flex-shrink:0;">
Shop Heatsinks
Bitaxe Heatsink — High-Performance Aluminum Cooler for Bitaxe & Nerdaxe Gamma / Supra / Ultra — Silent Operation & Stable Overclocking" width="80" height="80" loading="lazy" style="width:80px;height:80px;object-fit:contain;border-radius:6px;background:#1A1A1A;flex-shrink:0;">
Shop Heatsinks