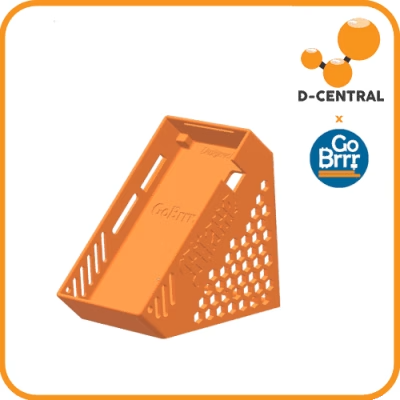
A window is the most common exit point for home-miner exhaust, and also the most commonly botched one. Cracked-open sashes with a duct wedged in the gap, cardboard and duct tape, foam that sags by week two — we’ve seen the photos. The good news: doing it properly costs one sheet of plywood or acrylic, a purpose-built port, and an afternoon. This guide covers the whole job — why you’re doing it, how to build the insert, which port to use, and what a Canadian winter will do to a sloppy version of it.
Why dumping the exhaust matters
An ASIC miner is a heater that hashes. Every watt it draws leaves as hot air, and if that hot air stays in the room, it becomes the miner’s own intake. That’s the recirculation loop, and it’s the quiet killer of small mining setups: intake temperature creeps up, the machine’s cooling has less headroom, fans ramp harder and louder, and in a small enough room the whole thing spirals until the miner throttles or trips a temperature fault.
Breaking the loop means giving the exhaust somewhere to go that isn’t the intake. A window is usually the nearest opening that doesn’t involve cutting a hole in your house — which makes it the natural exit for renters and anyone not ready to commit to a wall penetration. The mechanics of moving that air — how much, through what size duct, with what fan — are covered in our Bitcoin mining ventilation guide, and you can put numbers on your own room with the mining room ventilation calculator. This article is about the exit itself.
The window-port approach
The setup that actually works is simple: replace part of the window opening with a rigid panel, and mount a proper duct port in that panel. Not a duct resting on a sill. Not a gap stuffed with towels.
Build the insert
Measure the channel of your window — width and height of the opening the sash slides in — and cut a panel to fit snugly. Half-inch plywood is the workhorse; clear acrylic costs more but keeps the daylight and looks less like a boarded-up window from the street. Slide the panel into the track where the window would normally close, seat it against weatherstripping, and lower the sash onto its top edge. Done right, the panel is held by the window itself and comes out in thirty seconds when you move.
Mount the port
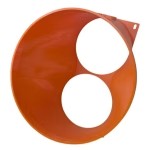
Cut a round hole in the panel and mount the port over it. Our 6-inch window port and 8-inch window port are single-piece plates designed for exactly this job: countersunk screw holes so the fasteners sit flush, a gasket groove in the mounting face so you can seat a bead of gasket material between plate and panel for a real seal, gussets on the collar so the duct’s weight doesn’t work the joint loose, and a retention rebate that holds an insect screen disc behind tabs. The 6-inch port is a 210 mm square plate; the 8-inch is 248 mm square — check that your panel (and your window channel) has room for the plate, not just the hole.
Two design notes worth knowing before you build:
- There is no backdraft flap. A gravity flap needs a hinge and running clearance, and these ports are deliberately printed as a single piece — a one-piece design can’t hinge. So when the miner is off, outside air can come back through. The fix is manual: block the port when it’s not in use. A removable plug or cap over the collar for the off-season, a foam disc pushed into the bore, or simply pulling the insert panel entirely — any of them takes thirty seconds and seals the opening properly.
- Screen material is not supplied. The port holds a screen; it doesn’t ship with one. Cut your own disc from standard window screen or aluminum insect mesh, sized to the bore plus about 7 mm so the tabs can grip the edge.
Rigid port vs. flex-collar port
The current ports have a rigid socket: 6-inch or 8-inch snap-lock pipe slides straight in. That’s the clean setup if your run is rigid pipe. If you’re running flex duct — and most window-vent builds are — know that a flex core won’t seat directly in a rigid socket; you bridge it with a short metal splice collar from the hardware store, or end the run in rigid for the last section.
Flex-collar versions of the window ports are now in the line — 6-inch and 8-inch: same plate, gasket groove, and screen retention, but with a male collar the flex duct slips straight over, worm clamp behind the bead. A male collar has to fit inside the duct, so its through-bore is smaller — about 9.7% less free area on the 6-inch flex version, roughly 7% on the 8-inch, compared to their rigid siblings. That’s the geometry of a slip-over connection, and what it buys you is a joint you make with one worm clamp and no splice collar. Take the rigid socket when the run is rigid pipe, the flex collar when it isn’t.
Running the duct to the window
The port is the exit; the run decides how hard your fans work getting there. The rules are the same as any duct job:
- Shortest path wins. Put the miner near the window if you can. Every metre of duct — especially flex — adds friction the miner’s axial fans must push against.
- Fewest bends win. Where you must turn, a pair of 45-degree elbows turns a corner with less loss than one hard 90 — standard published duct-fitting behaviour, and the reason our line stocks 45s in both sizes.
- Pull flex taut. Compressed, sagging flex duct is dramatically more restrictive than the same duct stretched straight — that’s textbook HVAC, not our invention.
- Start at the machine with a real shroud. The dual-120 to 6-inch shroud captures both exhaust fans of an S19 or standard S21 into one duct; the 8-inch version is the pick for longer runs where you don’t want the duct to be the restriction. Sizing between the two is its own topic — see the shroud hub for the full fitting family.
Everything above is designed against published duct standards and careful CAD, and every one of these parts carries its full interface dimensions on its product page. The designs are also open source — free STL files under CC BY-SA 4.0 on the 3D models page — so if you own a printer, you’re welcome to print the port yourself, modify it for your weird basement window, or even sell your prints. We publish them precisely so people can.
Winter reality in Canada
We’re in Montreal, Quebec. We know what February does to a window vent.
- Condensation. Warm exhaust air carries moisture, and where it meets a cold surface — the duct wall near the window, the panel, single-pane glass — it condenses. Insulate the last stretch of duct, keep the run sloped slightly toward the exit so any condensate drains out rather than pooling, and use acrylic or sealed plywood for the insert so drips don’t wick into raw wood.
- Drafts. Remember, no backdraft flap: an idle port in January is a hole in your building envelope. Cap or plug it whenever the miner is down, and seal the insert’s perimeter with weatherstripping — the gasket groove handles the port-to-panel joint, but the panel-to-window joint is on you.
- Sealing pays twice. Every leak around the insert is cold air in winter and a noise path all year. A tube of removable sealant or good foam tape is the cheapest upgrade in this whole build.
And the winter flip-side: that exhaust is heat you already paid for. In a Canadian winter you may want it indoors — ducted to the hallway instead of out the glass, offsetting your heating bill. Many builders run a summer configuration (out the window) and a winter configuration (into the house), which is exactly the kind of seasonal reconfiguration a removable insert makes painless. The ventilation guide covers the heat-reuse angle in depth.
Renter-friendly by design
Nothing in this build touches the building permanently. The insert sits in the window track; the port screws to the insert, not the wall; the whole assembly comes out and the window closes as if nothing happened. That’s the difference between this and a through-wall vent — no landlord conversation required. Keep the offcut from your panel and you can even restore the window in minutes for an inspection.
Security and insects
An insert in a half-open window means the window can’t lock normally. Solve it the way sliding-door owners always have: cut a wooden dowel or bar to length and lay it in the track above the sash so the window can’t be forced further open from outside. For bugs, use the port’s screen retention — cut a mesh disc (bore plus ~7 mm), seat it behind the tabs, and clean it occasionally, because a lint-and-dust-caked screen is a restriction like any other.
If the miner lives in an enclosed space rather than an open room, this window exit is the final stage of a bigger build — our mining closet guide covers the enclosure, and the noise reduction guide explains why a sealed exit with a real gasket also matters acoustically. Everything in the duct path, from shroud to port, lives in the shroud and ducting line — and if the open-source files save you money or a build headache, the fund is how this work keeps shipping.
FAQ
Can I just point the miner’s exhaust at an open window?
It’s better than nothing and worse than almost anything else. Without a sealed duct to the opening, a large share of the hot air rolls back into the room and recirculates, and the open window lets in noise complaints’ favourite frequency — your fans. A ducted, sealed port moves the heat out and keeps the opening closed around it.
Do I need a fan in the duct, or are the miner’s fans enough?
For a short, straight run to a nearby window, a modern ASIC’s own exhaust fans generally handle it. As the run gets longer or gains bends, back-pressure climbs and an inline duct fan starts earning its place. Work out your room’s airflow with the ventilation calculator and let the numbers decide.
What stops cold air blowing back in when the miner is off?
You do. The single-piece design has no backdraft flap — a flap needs a hinge, and a one-piece print can’t have one, which is also why there is nothing in the airway to rattle loose or snap off. Plug or cap the port when the machine is down, or pull the insert entirely for the off-season.
Will this work with 8-inch duct, or only 6-inch?
Both — the 8-inch port uses the same plate design with the same gasket groove and screen retention. The constraint is space: its plate is 248 mm square, so measure your window channel and panel before you order. On a narrow window, a practical alternative is running an 8-inch trunk and stepping down to a 6-inch exit with a reducer right before the port.